The Top 10 Best Haircuts Before and After Hair Fibers: A Complete 2026 Transformation Guide
If you’ve ever walked out of a high-end barbershop wondering why your hair looks significantly thicker and sharper than it does at home, you’ve likely witnessed the magic of a fiber haircut. For many, the challenge isn’t just finding the right style; it’s dealing with the reality of thinning areas, a receding hairline, or a crown that shows a bit too much scalp under bright lights.
You don’t need to be a professional barber to achieve these results. Whether you are experiencing “diffuse thinning” (hair that is thinning out all over) or simply want a more “defined” look for a special event, Finally Hair building fibers act as a “2-minute pain-free hair transplant.”
What Exactly is a Fiber Haircut?
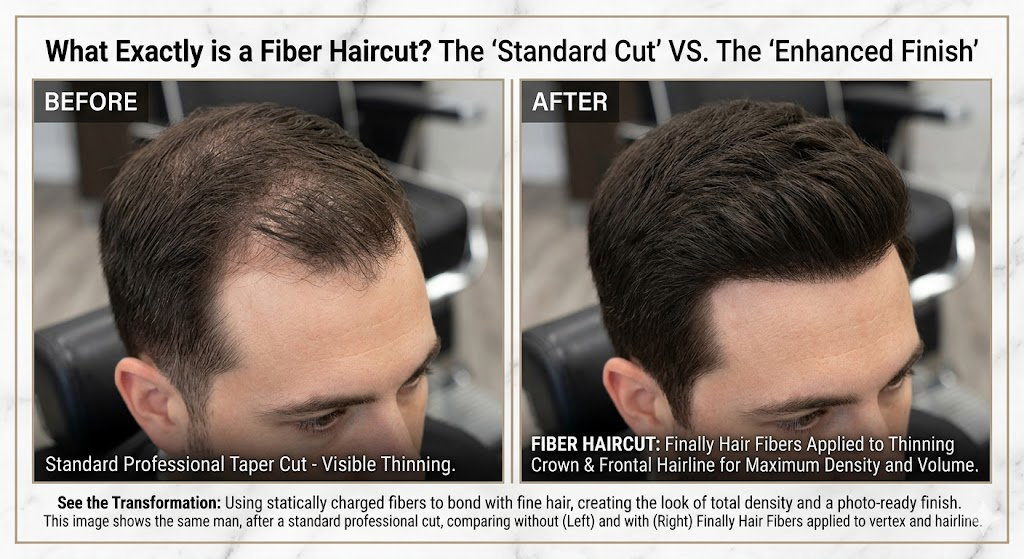
To a layman, a fiber haircut is a standard professional cut that has been “enhanced” using statically charged keratin or cotton micro-fibers. These fibers bond to your existing hair strands—no matter how fine they are—to create the appearance of total density. It’s the difference between a hairline that looks “okay” and one that looks “photo-ready.”
In this guide, we break down the top 10 haircuts that work best with fibers. We’ll explain:
-
The Cut: What to ask your barber for in plain English.
-
The Enhancement: Exactly where to apply Finally Hair fibers to hide thinning and maximize volume.
-
The Finish: How to ensure your style is wind-proof, sweat-proof, and completely undetectable to the naked eye.
From the sharp edges of a Line-Up to the sophisticated density of an Executive Side Part, discover how the right haircut combined with doctor-recommended hair fibers can restore your confidence and your hairline instantly.
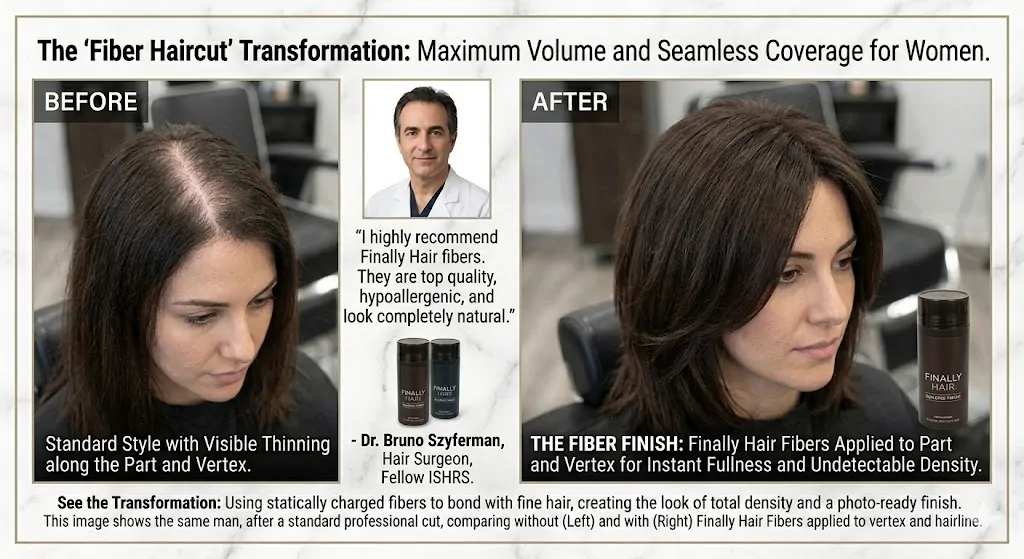
According to Dr. Bruno Szyferman, renowned Hair Surgeon, in the world of modern grooming, the difference between a “good” haircut and a “masterpiece” often comes down to density and precision. Whether you are dealing with diffuse thinning, a receding hairline, or simply want that “high-definition” look seen on social media, hair building fibers are the secret weapon of top-tier barbers.
This guide explores the top 10 haircuts that benefit most from fiber enhancement, providing detailed technical instructions for the cut and specific application strategies for Finally Hair building fibers.
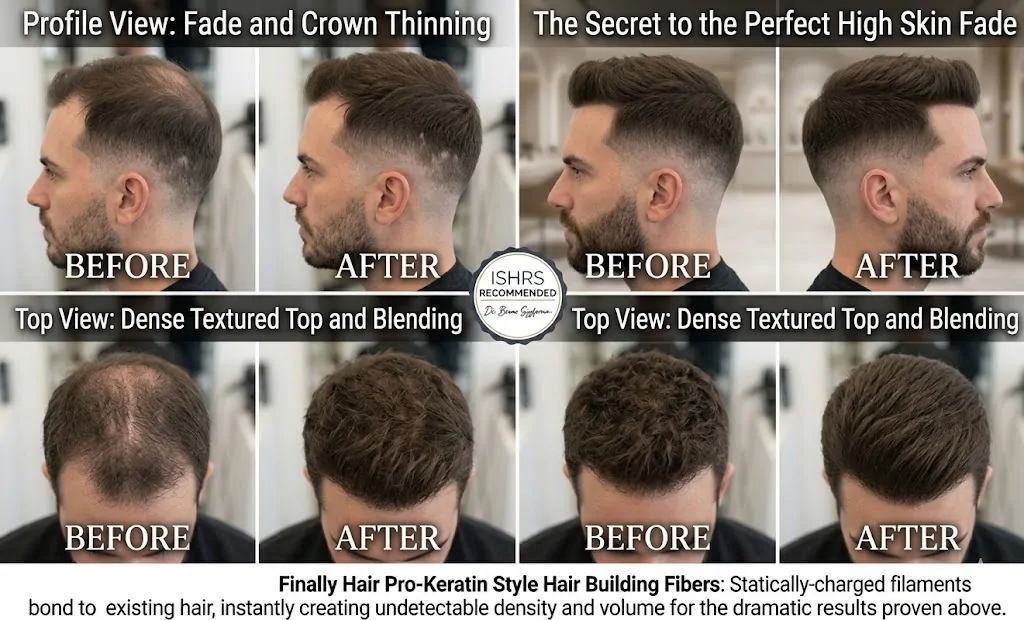
1. The High Skin Fade with Textured Top
This is the gold standard for the modern “fiber haircut.” The high contrast between the skin-tight sides and the dense top makes it the perfect canvas for enhancement.
How to Perform the Haircut:
-
The Fade: Use a balding clipper to drop the sides to skin, starting at the temple and curving around the occipital bone.
-
The Blend: Use a #0.5 guard through a #2 guard to create a seamless transition.
-
The Top: Point-cut the top to roughly 3 inches, leaving more length toward the fringe to create volume.
Where to Apply Fibers:
-
The Transition Line: Apply fibers where the fade meets the longer hair on top to eliminate any “light spots.”
-
The Crown: If the swirl is thinning, use Finally Hair fibers to close the gap.
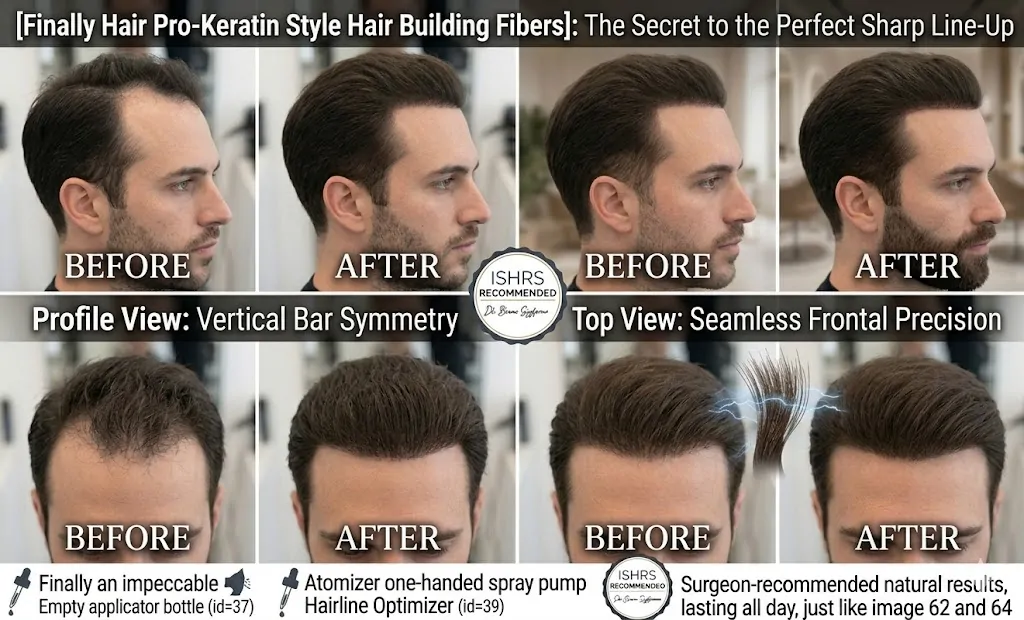
2. The Sharp Line-Up (The “Big Chop” Enhancement)
Nothing defines a haircut like a crisp, straight-edge hairline. If the natural hairline is uneven, fibers create a “perfect” symmetry.
How to Perform the Haircut:
-
Preparation: De-bulk the hairline with a #1 guard.
-
The Cut: Use a t-outliner to establish the center point of the forehead and work toward the vertical bars. Keep the lines as natural as possible.
Where to Apply Fibers:
-
The Vertical Bars: Spray fibers onto the vertical bars at the temples.
-
The Frontal Edge: Use a hairline optimizer to ensure the fibers don’t look “painted on.”
3. The Classic Side Part (Executive Contour)
This professional look requires a thick, defined part line. Fibers help define the “hard part” and add density to the “comb-over” section.
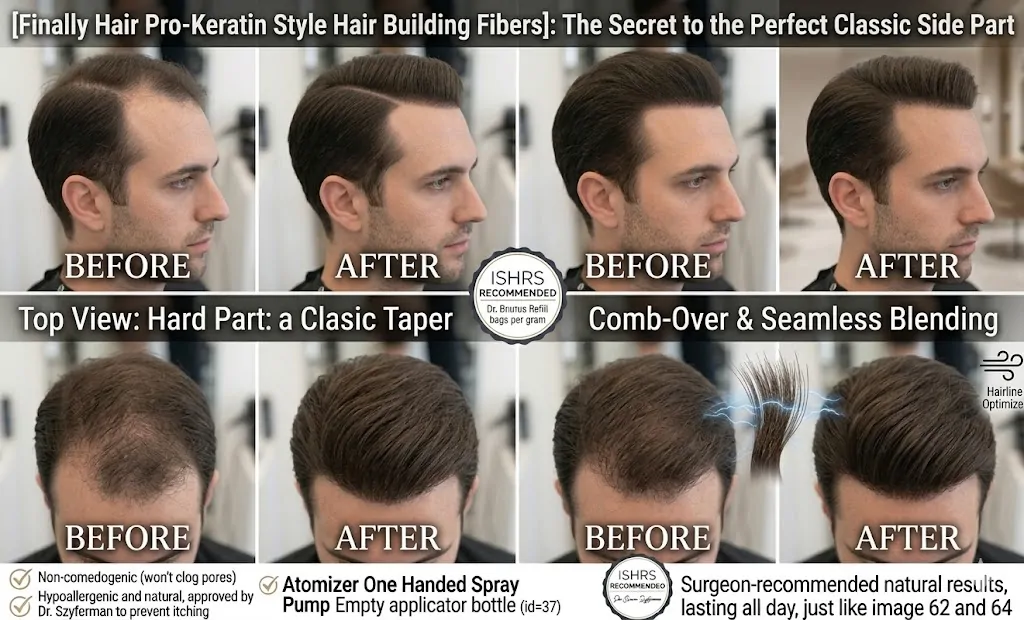
How to Perform the Haircut:
-
The Part: Locate the natural part and use a trimmer to slightly widen it (the “hard part”).
-
The Sides: A classic taper works best here, using guards #2 through #4.
Where to Apply Fibers:
-
The Parting Line: Apply a light dusting of fibers along the edge of the part to make it “pop.”
-
The Receding Temples: Fill in the “corners” of the forehead to create a more youthful, square shape.
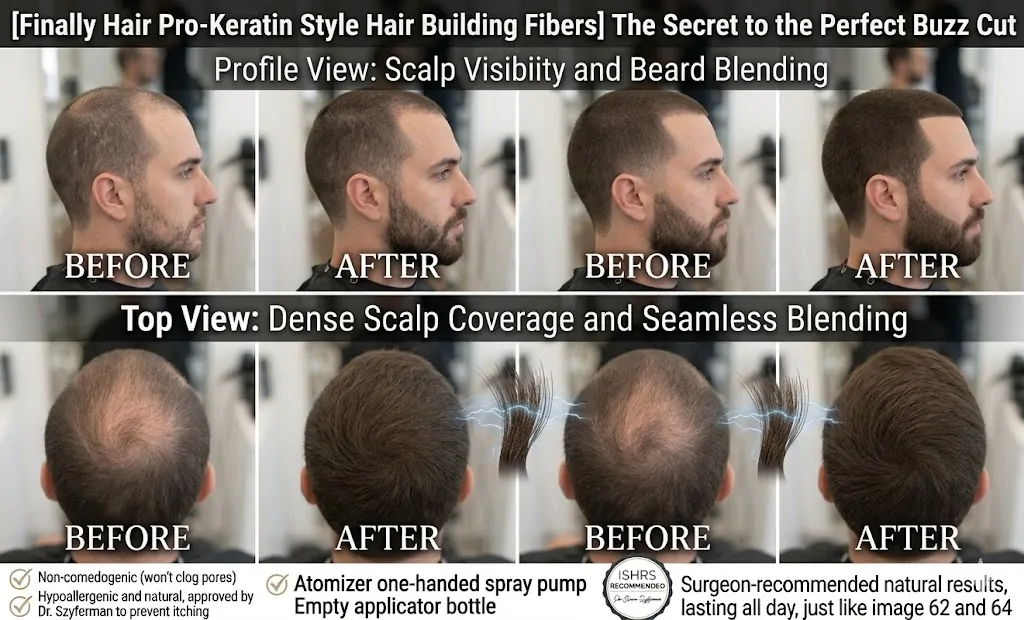
4. The Buzz Cut with Beard Fade
For men with thinning hair, the buzz cut is a brave and stylish choice. Adding fibers gives the illusion of a full head of hair that was simply “cut short by choice.”
How to Perform the Haircut:
-
The Head: Use a consistent #2 or #3 guard all over the scalp.
-
The Beard: Fade the sideburns into the beard, starting with a #0 at the ear.
Where to Apply Fibers:
-
The Scalp: Evenly distribute fibers across the top to hide any scalp visibility.
-
The Beard Patches: Use Finally Hair fibers to fill in patchy areas in the beard for a rugged, full look.
5. The Pompadour Fade
The Pompadour relies on height and volume. If the hair is fine, the “pomp” will collapse. Fibers add the necessary “grip” and density.
How to Perform the Haircut:
-
The Top: Leave 4–5 inches of length.
-
The Sides: Implement a mid-fade to draw the eye upward toward the volume.
Where to Apply Fibers:
-
The Roots: Apply fibers directly to the roots before back-combing to provide structural support.
-
The Surface: Sprinkle on the exterior of the pomp to hide any gaps caused by the hair’s elevation.
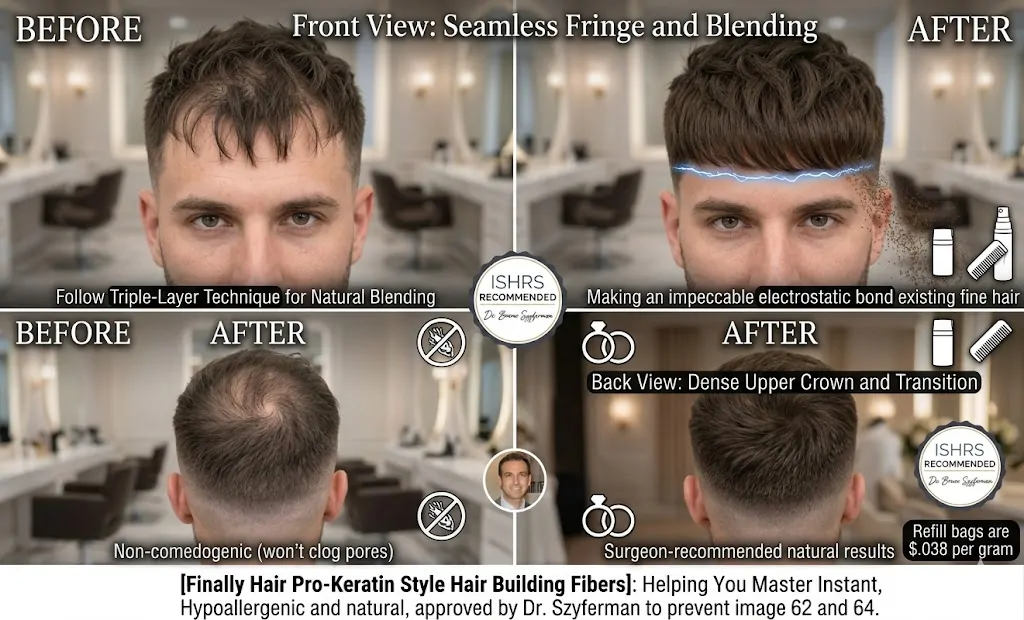
6. The Long Textured Fringe (Crop Top)
Popularized by the “French Crop,” this look is excellent for concealing a receding hairline.
How to Perform the Haircut:
-
The Fringe: Cut the front hair straight across or with heavy texture, resting mid-forehead.
-
The Sides: High fade with a sharp “weight line” near the top.
Where to Apply Fibers:
-
The Fringe Line: Apply fibers to the tips of the fringe to make the front look incredibly thick.
-
The Upper Crown: This area often thins first; use fibers to ensure the “forward-directed” hair looks dense from the back.
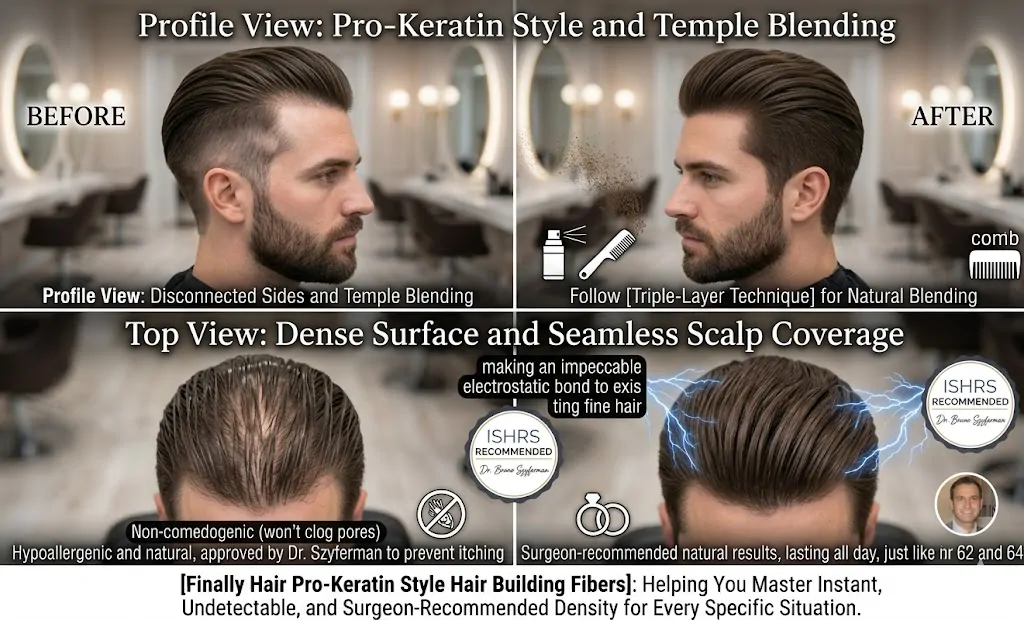
7. The Slicked Back Undercut
This style requires the hair to be pulled back, which unfortunately often reveals thinning at the crown or temples.
How to Perform the Haircut:
-
The Disconnect: Shave the sides and back to a uniform length (usually #1 or #2) without blending into the top.
-
The Top: Slick back using a high-shine pomade.
Where to Apply Fibers:
-
The Entire Top Surface: Because the hair is slicked, the scalp often “shines through.” A heavy application of finally hair fibers followed by Fiber Lock Spray is essential.
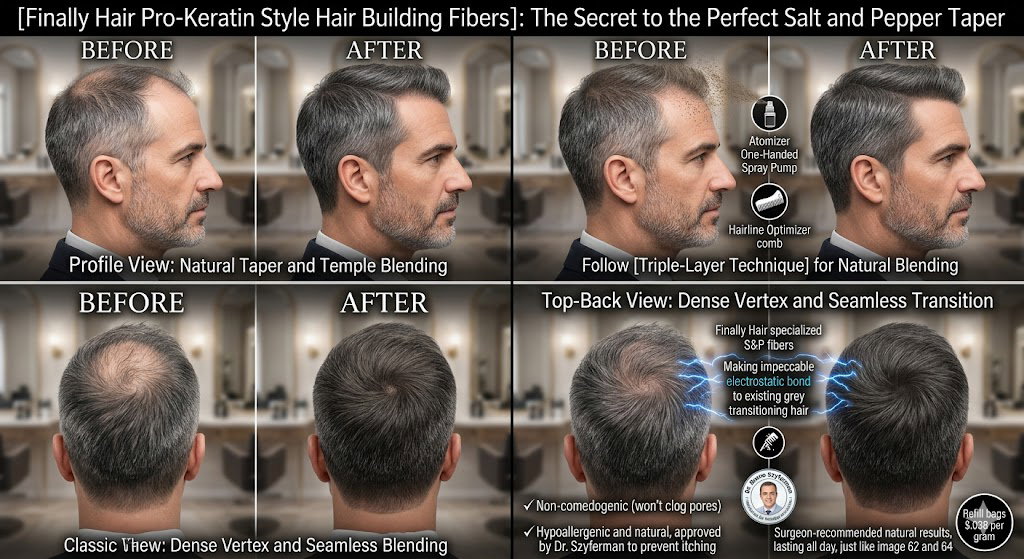
8. The Salt and Pepper Taper
For the distinguished gentleman, matching fibers to grey-transitioning hair is the ultimate test of a brand.
How to Perform the Haircut:
-
The Taper: Use a scissor-over-comb technique to keep the look soft and natural.
-
The Neckline: Taper to the skin for a clean finish.
Where to Apply Fibers:
-
The Vertex: Apply Finally Hair’s specialized Salt & Pepper shades to the vertex (the very top-back of the head).
-
The Temples: Gently fill in the “peak” of the hairline.
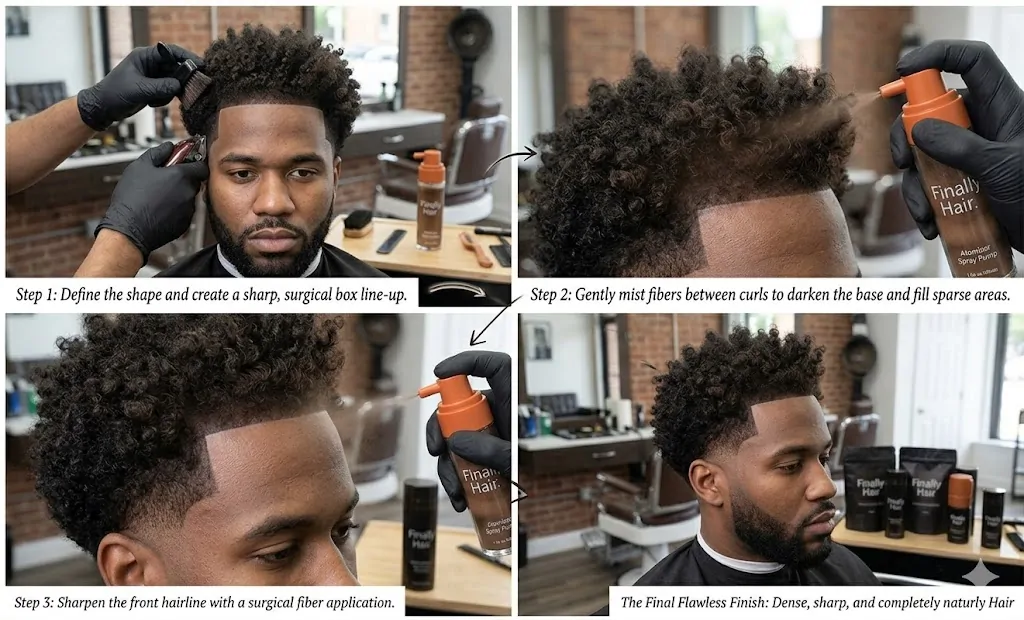
9. The Tapered Afro / Curly Top
Curly hair provides great natural volume, but the scalp is often visible between the curls.
How to Perform the Haircut:
-
The Shape: Use free-hand clippers to round out the afro or curls.
-
The Edge: A sharp “box” line-up at the front.
Where to Apply Fibers:
-
Between the Curls: Gently “mist” fibers into the hair so they settle on the scalp and lower hair shafts to darken the base.
-
The Line-Up: Use the Atomizer Spray Pump for a surgical front line.
10. The Ivy League (Modern Crew Cut)
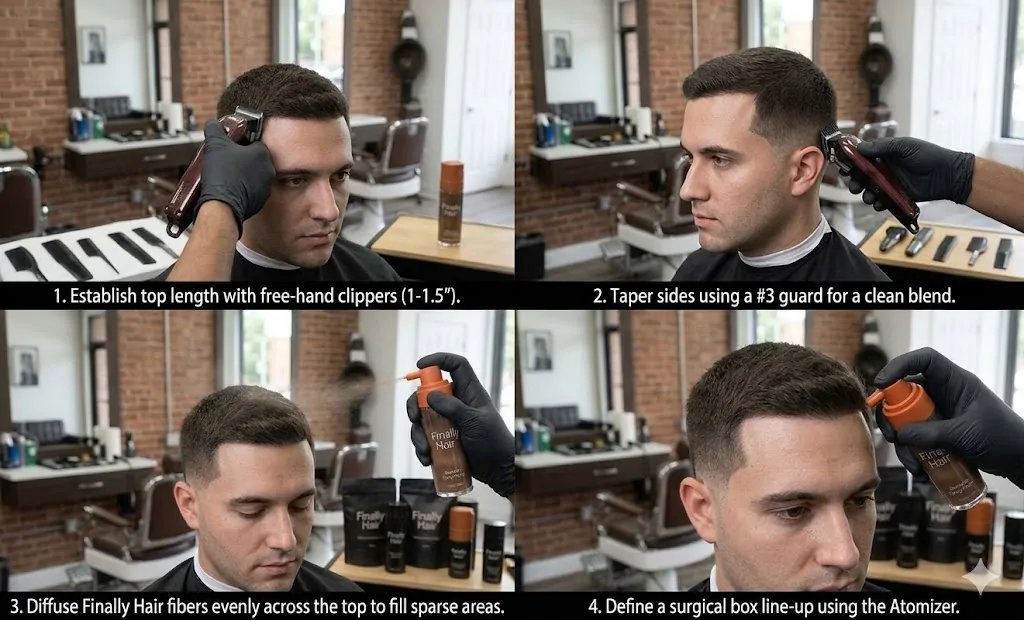
A conservative, short style that is the most common “office” haircut.
How to Perform the Haircut:
-
The Top: 1–1.5 inches, slightly longer at the front to be swept to the side.
-
The Sides: Tapered #2 or #3.
Where to Apply Fibers:
-
Diffuse Thinning Areas: Most users of this cut have “general thinning.” Apply fibers evenly across the entire top.
-
The “Sunlight Spot”: Apply where overhead office lights typically hit the crown to prevent scalp reflection.
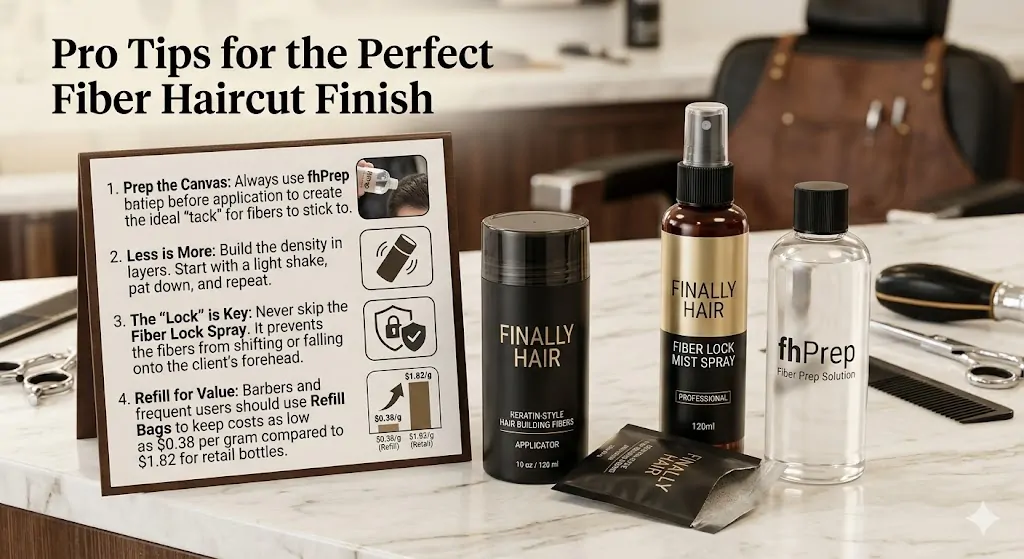
Pro Tips for the Perfect Fiber Haircut Finish
-
Prep the Canvas: Always use fhPrep before application to create the ideal “tack” for fibers to stick to.
-
Less is More: Build the density in layers. Start with a light shake, pat down, and repeat.
-
The “Lock” is Key: Never skip the Fiber Lock Spray. It prevents the fibers from shifting or falling onto the client’s forehead.
-
Refill for Value: Barbers and frequent users should use Refill Bags to keep costs as low as $0.38 per gram compared to $1.82 for retail bottles.
Frequently Asked Questions (FAQ) for Fiber Haircuts With Undetectable Density
How long does a fiber haircut last?
A fiber haircut typically lasts until your next shampoo. When locked in with Fiber Lock Spray, the fibers are resistant to wind, light rain, and perspiration.
Will hair fibers damage my natural hair or scalp?
No. High-quality products like Finally Hair fibers are non-comedogenic, meaning they will not clog pores. They are hypoallergenic and safe for daily use, even for those with sensitive skin.
Can I use hair fibers with styling products like gel or pomade?
Yes. For the best results, use the “Style First, Apply Last Technique.” Apply your pomade or gel, style your hair, let it dry or set, and then apply the fibers to fill in any remaining gaps.
The “Style First, Apply Last” technique is the professional standard for ensuring that hair fibers look natural and stay in place when used alongside traditional styling products like gels, waxes, or pomades.
This method prevents the “clumping” or “muddy” appearance that can occur if you try to style your hair after the fibers have already been applied.
Step-by-Step Breakdown
-
Style First (The Foundation): Apply your preferred styling product (gel, pomade, or paste) to damp or dry hair as you normally would. Shape your hair into the desired look—whether it’s a Slicked Back Undercut or a Textured High Fade.
-
Let it Set: Wait for the styling product to dry or “set.” If you apply fibers to wet gel, the fibers will absorb the moisture and clump together, making them look obvious rather than like individual hair strands.
-
Apply Last (The Finish): Once your style is locked in, use Finally Hair Building Fibers to fill in any remaining thin spots or to sharpen the hairline. Since the hair is already in its final position, the fibers will sit on top and bond to the strands exactly where density is needed.
-
The Final Lock: Lightly mist the area with Fiber Lock Spray. This acts as the final “seal,” ensuring the fibers and your styling product work together to resist wind and sweat.
Why This Technique Works
-
Prevents Shifting: Moving your hair around with a comb or fingers after applying fibers can shake them loose or create uneven patches.
-
Maintains Texture: It allows your styling product to provide the “hold” while the fibers provide the “thickness,” without one interfering with the other.
-
Undetectable Results: By applying fibers last, you ensure they stay on the hair shaft rather than getting buried or smeared against the scalp by your styling cream.
Pro Tip: For precision styles like a Sharp Line-Up, use the Atomizer Spray Pump during the “Apply Last” phase to target specific gaps without disturbing your styled hair.
How do I choose the right color?
Match the fibers to your root color, not your ends. Finally Hair offers 23 specialized shades, including unique Salt & Pepper mixes, to ensure an undetectable match.